Difference between revisions of "Bleed the cooling system"
m |
|||
| (3 intermediate revisions by one other user not shown) | |||
| Line 1: | Line 1: | ||
[[Image:bleed screw.jpg|thumb|left|Plastic bleed screw]] | [[Image:bleed screw.jpg|thumb|left|Plastic bleed screw]] | ||
| − | There are two bleed screws on the Elise cooling system. One is on the front | + | There are two bleed screws on the Elise cooling system. One is on the front left side on the hose that exits the radiator. You may be able to reach it from above by shoving your hand down next to the radiator shroud. Otherwise turn the wheel on full right-hand lock and you should find it behind the wheelarch liner. If not remove the road wheel and you'll see it no problem. |
[[Image:Bleed screw in engine bay.jpg|thumb|right|Bleed screw position in the engine bay]] | [[Image:Bleed screw in engine bay.jpg|thumb|right|Bleed screw position in the engine bay]] | ||
The other is in the engine bay on the metal pipe that runs across the top of the gearbox. (8mm) | The other is in the engine bay on the metal pipe that runs across the top of the gearbox. (8mm) | ||
| − | The best way to bleed the system is to remove the expansion tank cap and allow the car to idle until it reaches 60C or so. Then increase the revs to around 2000/2500rpm. Once the return pipe is hot in the engine bay (the one with the bleed screw) and the radiator is hot all over the [[thermostat]] has opened and you can bleed the system. | + | The best way to bleed the system is to remove the expansion tank cap put the heater on high with the blower fan off and allow the car to idle until it reaches 60C or so. Then increase the revs to around 2000/2500rpm. Once the return pipe is hot in the engine bay (the one with the bleed screw) and the radiator is hot all over the [[thermostat]] has opened and you can bleed the system. |
Be very careful not to lose the bleed screws or any washers on them. And be very careful of the hot coolant. I find two or three pairs of latex gloves insulate enough to prevent burning. | Be very careful not to lose the bleed screws or any washers on them. And be very careful of the hot coolant. I find two or three pairs of latex gloves insulate enough to prevent burning. | ||
| Line 14: | Line 14: | ||
[[Image:Rad_bleed.JPG]] | [[Image:Rad_bleed.JPG]] | ||
| − | Note for LHD cars: the front bleed screw is located on the right side, best accessed through the right wheelarch (At least on mine - LHD S2 K series) | + | Note for LHD cars: the front bleed screw is located on the right side, best accessed through the right wheelarch (At least on mine - LHD S2 K series). It looks like not S2 K series are the same since I have come across that has the front bleed screw on the left. The front bleed screw is on the radiator exit. |
[[Category:Engine Cooling]] | [[Category:Engine Cooling]] | ||
[[Category:DIY]] | [[Category:DIY]] | ||
| Line 24: | Line 24: | ||
| − | S2 Exige: | + | |
| + | == S2 Exige: == | ||
| + | |||
Front Bleed screw located on the DRIVERS side you can remove the wheel arch liner (front section) to feel for the bleed screw. | Front Bleed screw located on the DRIVERS side you can remove the wheel arch liner (front section) to feel for the bleed screw. | ||
| + | |||
| + | |||
| + | |||
| + | == Pressure bleeding (S1/S2 K-Series): == | ||
| + | |||
| + | |||
| + | Taken from [http://arc.seloc.org/viewthread.php?tid=268263&page=1 http://arc.seloc.org/viewthread.php?tid=268263&page=1], credit to Rotivator | ||
| + | |||
| + | ''"Had to change my coolant today following a rad and fan change. Didn't have the proper service tool (as if I ever have) to pressure bleed the system so knocked this up out of an old bike inner tube.'' | ||
| + | |||
| + | ''Tied a knot in one end and stretched the other end over the open coolant bottle. Then attached a foot pump and pressurised the system. Did the bleeding as per manual - bled rear first then front, and worked a dream."'' | ||
| + | |||
| + | [[File:DSC01176a.jpg]] | ||
| + | |||
| + | For a less pikey version Stefan3 posted a tip using a modified coolant cap [http://arc.seloc.org/viewthread.php?tid=337951&page=1 http://arc.seloc.org/viewthread.php?tid=337951&page=1]. | ||
| + | |||
| + | [[File:p1050083small.jpg]] | ||
Latest revision as of 14:04, 10 June 2014
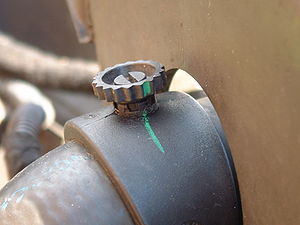
There are two bleed screws on the Elise cooling system. One is on the front left side on the hose that exits the radiator. You may be able to reach it from above by shoving your hand down next to the radiator shroud. Otherwise turn the wheel on full right-hand lock and you should find it behind the wheelarch liner. If not remove the road wheel and you'll see it no problem.
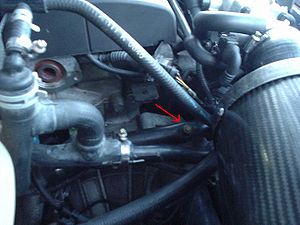
The other is in the engine bay on the metal pipe that runs across the top of the gearbox. (8mm)
The best way to bleed the system is to remove the expansion tank cap put the heater on high with the blower fan off and allow the car to idle until it reaches 60C or so. Then increase the revs to around 2000/2500rpm. Once the return pipe is hot in the engine bay (the one with the bleed screw) and the radiator is hot all over the thermostat has opened and you can bleed the system.
Be very careful not to lose the bleed screws or any washers on them. And be very careful of the hot coolant. I find two or three pairs of latex gloves insulate enough to prevent burning.
Handy hint - on an S2, the front bleed screw can be best turned by using a 10p coin in the slot of the screw head. Much easier than trying to turn it by the knurling on the edge and much much easier than getting a screwdriver in there. The S1 was just a thumbscrew. Take care not to over-tighten this screw as well.
Oh and as you're bleeding keep an eye on the coolant level and top it up if it gets low - you don't want to draw even more air into the system!!
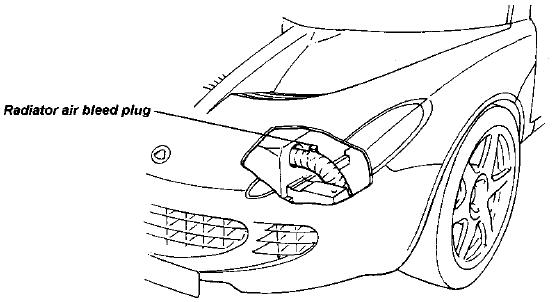
Note for LHD cars: the front bleed screw is located on the right side, best accessed through the right wheelarch (At least on mine - LHD S2 K series). It looks like not S2 K series are the same since I have come across that has the front bleed screw on the left. The front bleed screw is on the radiator exit.
S2 Exige:
Front Bleed screw located on the DRIVERS side you can remove the wheel arch liner (front section) to feel for the bleed screw.
Pressure bleeding (S1/S2 K-Series):
Taken from http://arc.seloc.org/viewthread.php?tid=268263&page=1, credit to Rotivator
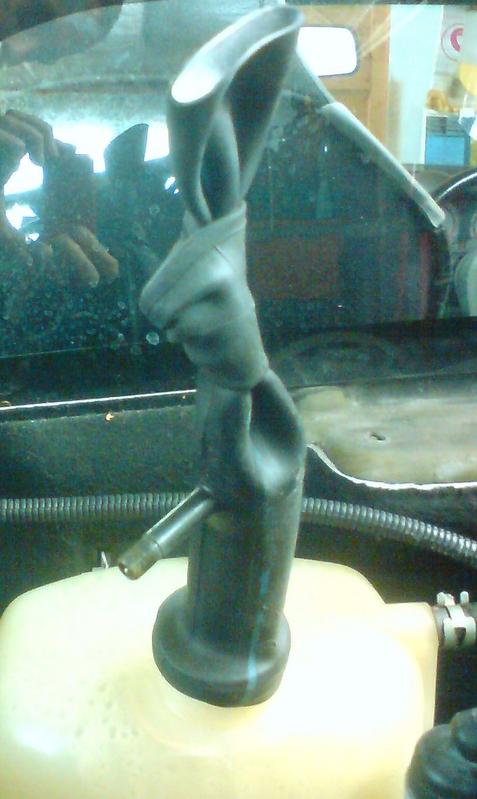
"Had to change my coolant today following a rad and fan change. Didn't have the proper service tool (as if I ever have) to pressure bleed the system so knocked this up out of an old bike inner tube.
Tied a knot in one end and stretched the other end over the open coolant bottle. Then attached a foot pump and pressurised the system. Did the bleeding as per manual - bled rear first then front, and worked a dream."
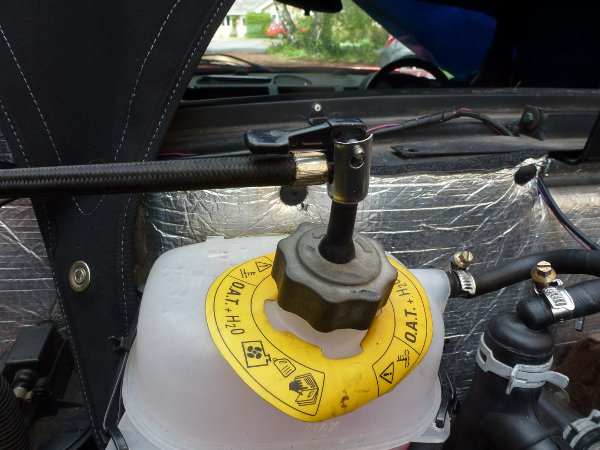
For a less pikey version Stefan3 posted a tip using a modified coolant cap http://arc.seloc.org/viewthread.php?tid=337951&page=1.
