Difference between revisions of "Heater Actuator Replacement"
Jump to navigation
Jump to search
| Line 8: | Line 8: | ||
2 Remove the air pipe from heater unit to flap direction unit | 2 Remove the air pipe from heater unit to flap direction unit | ||
| + | <gallery> | ||
| + | Image:big air pipe.jpg|The large ait pipe can be seen centre picture | ||
| + | </gallery> | ||
3 Separate heater unit from blower | 3 Separate heater unit from blower | ||
| + | <gallery> | ||
| + | Image:separate heater from blower.jpg | ||
| + | </gallery> | ||
4 Remove two coolant feeder pipes from heater unit | 4 Remove two coolant feeder pipes from heater unit | ||
5 Remove heater unit from car | 5 Remove heater unit from car | ||
| + | <gallery> | ||
| + | Image:Heater unit.jpg | ||
| + | </gallery> | ||
6 Remove actuator from heater unit and replace | 6 Remove actuator from heater unit and replace | ||
| + | <gallery> | ||
| + | Image:actuator prized open.jpg | ||
| + | </gallery> | ||
Revision as of 18:03, 28 November 2008
Elise S2 to VIN ????? have manual temperature control.
MY?? onwards has electronic controlled temperature adjustment which is prone to failure.
Procedure
2 Remove the air pipe from heater unit to flap direction unit
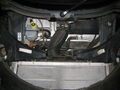
The large ait pipe can be seen centre picture

3 Separate heater unit from blower

4 Remove two coolant feeder pipes from heater unit
5 Remove heater unit from car

6 Remove actuator from heater unit and replace
