Difference between revisions of "Heater"
m |
|||
| (11 intermediate revisions by 3 users not shown) | |||
| Line 1: | Line 1: | ||
| − | + | For S1 see [[Heater_Matrix]] The S2 Elise and Exige have two types of heater controls, manual or electrical. Cars after 2002?? have electrical. | |
| − | The | + | The manual controls are prone to ceasure and the electrical controls prone to water ingress and failure. |
| − | |||
| + | ==Electrical controls== | ||
| + | There are three elements to the heating in the Elise S2 with electrical controls. | ||
| − | [[ | + | ===Fan/Blower=== |
| − | + | By far the most common failure relating to the heating is corrosion of the resistor pack. Single, multiple or all fan speeds are lost. A guide exists to change the [[resistor pack]] yourself. | |
| + | ===Flap distribution control=== | ||
| + | TBD?? | ||
| − | Remove | + | ===Heater temperature control=== |
| + | For heater temperature control failure try the following fixes, which increase in complexity: | ||
| + | # Remove air pipe and lube flap (See below) | ||
| + | # Replace actuator through service panel (Only for small handed people!) | ||
| + | # [[Heater Actuator Replacement]] after removing heater unit. | ||
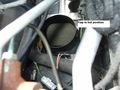
| − | [[ | + | <gallery> |
| − | + | Image:heater1.JPG|Remove the [[Access panel|Access panels]] and black plastic covers. | |
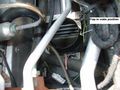
| + | Image:heater2.JPG|Remove the air hose (no clips hold it its pressure fit). | ||
| + | Image:heater3.JPG|Hose removed | ||
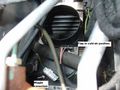
| + | Image:heater4.JPG|Lubricate (The flap may be stuck in other positions) | ||
| + | Image:heater5.JPG| | ||
| + | Image:heater6.JPG| | ||
| + | Image:heater7.JPG| | ||
| + | </gallery> | ||
| − | + | == DIY air filter == | |
| − | + | Modification to prevent grit from being sprayed onto the dash. You will need: | |
| + | * 1 used stocking. 10 denier is best for optimum fan performance. Higher deniers can reduce air flow too much. Lace top optional. | ||
| + | * Difficulty: Very, Very easy. | ||
| + | Directions: | ||
| + | # Open the front service compartment | ||
| + | # Remove one end of the air hose | ||
| + | # Stretch stocking over air hose | ||
| + | # Refit air hose. | ||
| − | + | Remember to replace or adjust the stocking annually, or when you notice a drop in airflow. | |
| − | |||
| − | |||
| − | + | [[Category:Body]] | |
| − | + | [[Category:Electrical]] | |
| − | + | [[Category:Lotus Elise]] | |
| − | [[ | + | [[Category:S2]] |
| − | |||
| − | |||
| − | [[ | ||
| − | |||
| − | |||
| − | [[ | ||
| − | |||
Latest revision as of 13:11, 11 December 2009
For S1 see Heater_Matrix The S2 Elise and Exige have two types of heater controls, manual or electrical. Cars after 2002?? have electrical.
The manual controls are prone to ceasure and the electrical controls prone to water ingress and failure.
Electrical controls
There are three elements to the heating in the Elise S2 with electrical controls.
Fan/Blower
By far the most common failure relating to the heating is corrosion of the resistor pack. Single, multiple or all fan speeds are lost. A guide exists to change the resistor pack yourself.
Flap distribution control
TBD??
Heater temperature control
For heater temperature control failure try the following fixes, which increase in complexity:
- Remove air pipe and lube flap (See below)
- Replace actuator through service panel (Only for small handed people!)
- Heater Actuator Replacement after removing heater unit.
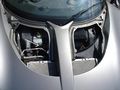
Remove the Access panels and black plastic covers.

Remove the air hose (no clips hold it its pressure fit).
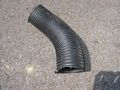
Hose removed
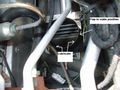
Lubricate (The flap may be stuck in other positions)


DIY air filter
Modification to prevent grit from being sprayed onto the dash. You will need:
- 1 used stocking. 10 denier is best for optimum fan performance. Higher deniers can reduce air flow too much. Lace top optional.
- Difficulty: Very, Very easy.
Directions:
- Open the front service compartment
- Remove one end of the air hose
- Stretch stocking over air hose
- Refit air hose.
Remember to replace or adjust the stocking annually, or when you notice a drop in airflow.